Showing posts with label painting wood and furniture. Show all posts

Wednesday, August 10, 2011

Painting Kitchen Cabinets

Inspired by beautiful white kitchens...
Such as this
And articles about painting wood like Why Men Fear Painting Wood by The Decorologist,
I decided it was time to finally take the plunge on my Mr. Food cabinets.


 (see this blogpost if you missed the Mr. Food reference.)

If you would like to jump on the painted cabinet wagon with me, here are some painting tips based on my extensive research into painting cabinets.  This is not something you want to mess up!
  • Wash cabinets with TSP (I got mine at Ace Hardware/my home away from home.)
  •  Lightly sand with fine or medium sandpaper (really I don't remember which!  I think I used 120 grit.)  I have an electric sander.
  • Wipe with dry cheesecloth to remove wood dust.

To the right is a wall that no longer exists ------>
  • Prime with OIL BASED primer.  I used Good ole Kilz.

  • Give it plenty of time to dry.  I'd go with however long it says on the can + however long it takes for you to gear back up to paint some more.  Could be anywhere between 24 hours and a year.
  • Paint with OIL BASED paint.  I used Benjamin Moore Satin Impervo paint which was pricey ($60/gallon) but totally worth it.  Ventilate - it is fumy.  My pupils got large and I started making funny jokes  (I thought they were funny anyway, but others just looked on with concern) before my mom made me open some windows.  BuzzKill.
    I used BM cloud white which they have paired with my favorite gray colors!
  • Wait for the inhalation high to wear off. 
  • Repaint a final coat.
  • One more tip - I never remove doors or even take drawers out.  Just paint around everything very carefully.  I only used a brush - no roller or sprayer.  And the dentil molding was a nightmare as usual.
  • There used to be a wall here.  And a cooktop.
  • Finally, I ran some caulk between cabinet seams that were still showing.  That probably should've been one of the first things I did, but I always have a personal goal to fill gaps full of paint to avoid much prep work.

This is going to look great!  Visualize!

Flooring, backsplash, and appliances will be installed in the next few days! 

Monday, June 13, 2011

Pulling off the two toned look

I have a friend who is considering (at the suggestion of her husband) painting her kitchen cabinets in a two-toned look.

To be honest, when I hear two-toned, I picture:

This
Not everyone can pull off this look.  In fact, maybe NO ONE can pull it off!

Then, it struck me like lightening!  Actually, it struck me like a Fiber One commercial.  Fiber has that effect on people.

I know you are scratching your head here.

But just WATCH THIS!!!

How cute are these cabinets?
still shot from the inspiring fiber one commercial
I think it is possible to pull off the two toned look!  My eyes have been opened!  Why was I so closed minded?  Here is another pretty one. 
Lavender and white looks so pretty!
I like how they painted the drawers and door fronts one solid color but the "framing" another color.

Not bad
Cute use of chalkboard paint on the doors!
So my advice to my friend is GO FOR IT!  I would help you but I am painting my own cabinets tomorrow (in a boring monotone, because I do not have courage like my friend.)

Saturday, April 30, 2011

Finish what you Start.

When I get around to it....
I am gonna put the final coat on these hall cabinets.
I'm gonna finish painting the ceiling and put a final coat on the light cover.
I'm also going to put the final coat of paint on the wainscot
I'm gonna clean up this trim with some paint and primer.
all of which will allow me to put up my painting supplies.
Today is the day to finish what I started.  Today is the day I get around to it.
 

Sunday, January 30, 2011

Dentil Molding

We have a great deal of Dentil Molding.  Until I looked it up on the internet, I thought it was actually Dental Molding because it looks like teeth.

Yes, kind of like these teeth, but scarier.
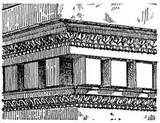
According to a random architecture website the experts in the field,  "A dentil is one of a series of closely spaced, rectangular blocks that form a molding."
Dentil Molding from Ancient Greece.
Primed Dentil Molding from My Living Room
The thing about painting Dental Dentil Molding is all those little spaces.  It's kind of like trying to floss these.  Not that I have tried.

Sharks can have up to 3,000 teeth.  And apparently, monster case of gingivitis.
I never found a brush that worked well.
One of the FOUR different brushes I tried - in vain.
Several days and a monster crick in my neck later - I was beginning to feel a little overwhelmed! 

Just go ahead and put me out of my misery.
But I pressed forward and finished my project.  By finished, I mean "Almost Finished."  The Almost is always implied.


Needs new accessories and handle pulls.
Unfortunately, this was just the little shark.  The big shark still looms in the waters.  Da, da, da, da...

Just a small snippet of the thousands of dentils in my kitchen.
I had an epiphany this morning. I think I need a bigger boat.  (That was a Jaws reference for those of you under 30.)  Really, I just need a new tool.


The Wagner Control Spray Max Paint Sprayer is in my future.
Look out!

Saturday, January 22, 2011

Paint Color - A love affair

Once, I went to ACE and came home with a purse full of paint swatches.  But only one caught my eye.
I think I love you.
I painted my bedroom Moonshine, and my bathroom Gray Horse.  That just left one color.

While watching Crossroads, teeth unbrushed at noon, I realized that one person could relate.  America's sweetheart.
One Britney Spears.

"With love, you should go ahead and take the risk of getting hurt... because love is an amazing feeling."

Let the wood painting begin.
I pushed aside my worries and purchased Storm Cloud Gray.   I was a little nervous about screwing up something important.
 "I'm rich, freakin' rich. It's crazy"

You know what, Brit?  I am not.  So I hope this commitment works out in my favor.

First, priming.


Now, there is no turning back.
Britney knows about stepping out of your comfort zone.

"The cool thing about being famous is traveling. I have always wanted to travel across seas, like to Canada and stuff."

I pressed forward, applying not only one coat, but two.
And I am pleased with my results.  


“There's no master plan! I'm just gonna be me and hope it all works out!”

Me, too, Brit.  Let's keep following our hearts!

Thursday, December 30, 2010

Highboy

I finished the highboy dresser today.  
I am going to recap by hitting the high points.

First, preparation:
I cleaned all the dirt out from inside the dresser.
Strangely enough, I felt sentimental toward the dust, knowing that some of it had to be from the wheat fields of Hansford County, where I grew up.  Well, I didn't grow up IN the wheat fields, but still, a little sentimental.

Having already finished some of the other pieces in this collection, I "used my prior knowledge" (that is a Carly-ism.)  Finding two-pronged pulls the same width as the old ones would be impossible. I filled some of the holes with spackle.  There was probably a more appropriate substance for wood-patching.  Sue me.  I like spackle.
  Like I always say, "Goes on pink - dries white!"
Then I painted two coats of oil-based black paint directly on the wood, without priming or sanding.  The truth is, the wood was so old and basically already bare.  It was begging for paint.

Next, after purchasing pulls, I had to drill new holes for the two-prongers (that's the technical term, a-hem, I am sure.)

I used this here marks-a-lot.
I colored the prongs with the marker, then used it as a stamp onto the paper.

See the little marks?  Now I have a stencil.
I used this paper as a stencil to mark where I needed to drill.  Thanks to my expert drilling skills and extreme patience, this step was both easy and enjoyable.*
*Sidebar - I may or may not have accidentally drilled the holes cock-eyed on a drawer and had to re-patch and re-paint and re-drill so as not to have a slanted pull. 
It's not this shiny and lacquered up in person.
Here it is in the room.
And there you have it!*
*Sidebar 2- I may or may not have brought the dresser in too soon, which resulted in wet oil based black paint on the new carpet.  If said event did take place, you may rest assured that I did get the paint out of the carpet.

Monday, December 27, 2010

Bedroom Suite from the 1950s

When my dad was born, Gramma Susie went all out on furnishings, purchasing a 6 piece oak bedroom suite, which followed him into his marriage to my mom.  

My sister, being firstborn and having dibs,  got a nightstand, double bed, long dresser, and matching mirror. My sister experienced many a nighttime bed collapse, which led to the eventual downfall (no pun intended) of the bed.  It disappeared from our lives in the 1980s. 

I acquired my father's highboy and nightstand.  When I was 5, I vividly remember the highboy crashing down on me.  Mom heard my screams and came to my rescue.  Oak is a rather heavy material.

My nightstand and highboy got a re-do by my ambitious pre-teen self. If only I had a digital camera and internet access in which to catalog my first use of the electric sander.  It was love at first site.

Here is the highboy over a decade later, looking a little worse for the wear.
And so, the furniture survived my parents divorce and many moves. 

Somehow, over the past decade, I have re-acquired all pieces, including my sister's (except for the bed.) 

The dresser
I paid some students an exorbitant amount of money to refinish the dresser in 2007.  I was struck with a helping spirit (and an apparent windfall of money) and decided to help the Medina Valley ISD woodworking class.  It was the most excited I have seen those two students about school EVER.  Trades classes...my money went to a good cause.  Or the boys went out and blew the money.   Whatever, they did a beautiful job, no?

A few years later, inspired by the heirloom collection from Potterybarn, I painted the bedsidetables and matching mirror frame a lovely color inspired by Pottery Barn.  I even tore a page from the magazine to carry with me to Sherwin Williams for matching purposes.
Pottery Barn Heirloom Green
Bedside tables, one of which has a love note written on the bottom of a drawer!
I placed these pieces in my office and the little drawers held pamphlets to give parents.  Because school counselors love pamphlets. 
Samples of School Counselor Ema's pamphlets on Glee.  I can totally relate.
The mirror was great for upset students.  They used it to freshen up before heading back to class, because the only thing worse than crying at school was allowing classmates to know that you were crying...at school...and seeking help from the counselor...

Finally, today the highboy dresser received a second makeover.  I will post pictures tomorrow!

Friday, November 26, 2010

Ode to Santa Cruz, Bolivia

I just finished painting the bathroom cabinets. 

With all my "formal" training (HGTV watching,) I was surprised that I had failed to forecast what was about to happen:  my forest green flooring and coordinating forest green counter tops would look extra foresty green when paired with white. 

"What's wrong with green and white?"
Not everyone has a problem with Forest Green.  It was really popular in the 90s.  In fact, I think it was invented in the nineties.
You know who appreciates Forest Green?  Ole Ralph Lauren.

I kept thinking.  This reminds me of something.
My husband is a Boston Celtics fan.

What could it be?
Green is all the rage!

And why should I have such a problem with Green and White?  Why do I have the sudden urge to sledgehammer the tile floor and throw sticks of dynamite in the sinks?

Drum roll...here is the unveiling!  Remember, you voted on this!

And here she is!  2 coats of primer and 3 coats of paint later.
What can I say?  I am muy popular in Santa Cruz, Bolivia!  ¡OlĂ©!
La Bandera Oficial de Santa Cruz, Bolivia

Any good black Friday deals on dynamite and sledgehammers?