Thursday, August 11, 2011

Stenciling

I fell in love with this room by theLENNOXX

I need more purple in my life.

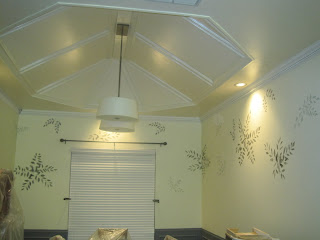
Having been unhappy with everything I have done in my kitchen so far (except for the cabinets) I decided to try some stenciling on the walls (that I will probably repaint soon anyway.)  My extremely artistic mother-in-law (MIL) came for a visit and I put her to work!  (Our project history goes way back before digital cameras existed - otherwise I could write a book.)

After an exciting field trip to my flower bed to observe some ferns, I had her sketch several individual branches on butcher paper.  I used an exacto to cut out the leaves.  Then my MIL sprayed the paper with spray varnish (which I didn't know existed but we found easily at WalMart.)  When it was dry, we had CUSTOM stencils.

We sprayed the backs (working one at a time) with this nifty stuff -

You can find me at Wal-Mart, too.
And stuck the stencil to the wall.  I dabbed using paint from my stash (mixed with a little glaze.) I worked one branch at a time.  Then MIL went back and HAND-PAINTED the stems.

Her husband told her to stay off ladders!
And this is the result -

CUSTOM AND HAND-PAINTED!
We used a few different colors, which tied the living and dining room together.
Some were done in the same color as the walls - but in high gloss.
You really cannot get the gist from a photo.

This is what the dining room really looks like right now!  UGH!
This was one of many fun we-can-try-this projects with my MIL!  I don't think theLENNOXX will be calling anytime soon, and I'm pretty sure my fern stage is short-lived, but I loved learning how to make my own stencils.

Wednesday, August 10, 2011

Painting Kitchen Cabinets

Inspired by beautiful white kitchens...
Such as this
And articles about painting wood like Why Men Fear Painting Wood by The Decorologist,
I decided it was time to finally take the plunge on my Mr. Food cabinets.


 (see this blogpost if you missed the Mr. Food reference.)

If you would like to jump on the painted cabinet wagon with me, here are some painting tips based on my extensive research into painting cabinets.  This is not something you want to mess up!
  • Wash cabinets with TSP (I got mine at Ace Hardware/my home away from home.)
  •  Lightly sand with fine or medium sandpaper (really I don't remember which!  I think I used 120 grit.)  I have an electric sander.
  • Wipe with dry cheesecloth to remove wood dust.

To the right is a wall that no longer exists ------>
  • Prime with OIL BASED primer.  I used Good ole Kilz.

  • Give it plenty of time to dry.  I'd go with however long it says on the can + however long it takes for you to gear back up to paint some more.  Could be anywhere between 24 hours and a year.
  • Paint with OIL BASED paint.  I used Benjamin Moore Satin Impervo paint which was pricey ($60/gallon) but totally worth it.  Ventilate - it is fumy.  My pupils got large and I started making funny jokes  (I thought they were funny anyway, but others just looked on with concern) before my mom made me open some windows.  BuzzKill.
    I used BM cloud white which they have paired with my favorite gray colors!
  • Wait for the inhalation high to wear off. 
  • Repaint a final coat.
  • One more tip - I never remove doors or even take drawers out.  Just paint around everything very carefully.  I only used a brush - no roller or sprayer.  And the dentil molding was a nightmare as usual.
  • There used to be a wall here.  And a cooktop.
  • Finally, I ran some caulk between cabinet seams that were still showing.  That probably should've been one of the first things I did, but I always have a personal goal to fill gaps full of paint to avoid much prep work.

This is going to look great!  Visualize!

Flooring, backsplash, and appliances will be installed in the next few days!