Tuesday, March 30, 2010

My Little Yoshi

Our son often has strange requests. At the age of 1, he began to demand fishsticks every morning for breakfast. He preferred them microwaved. The day could not begin without the fresh smell of nuked fishsticks.
His current fascination involves Super Mario Bros. As a 90s child myself, I can relate. I remember rushing home from school in my Buckwheat "oh-tay" t-shirt to spend waaaay to much time in front of our seven ton TV playing Retro Mario. Only I didn't realize it was retro.
Well, our little one is turning 5 tomorrow. Each year, we do the same thing. We go to Chuck-E-Cheese's. We do not invite his friends. He doesn't want to invite friends because he doesn't like to have "Happy Birthday" sung to him, especially the phrase "and many more...." for some unknown reason. Obviously, he has not completely figured out that more friends = more presents.
Traditionally, if you are a child in our home, you are awoken with cake and presents on your birthday. And so begins my predicament each year, trying to find cakes for both of our children (our daughter's birthday is one week after our son's.) Since I typically wimp out on birthday parties, I try harder to please with the pastery. Plus, I'm a fan of all things frosted.
This year, Conrad decided that he wanted a Yoshi Cake. FYI - Yoshi is a dinosaur on Super Mario Bros. I searched the local Walmart (which I like the call "The Walfarts") and alas, no Yoshi. With few other options in West Texas, I began my Google search, which led me to ebay, which led me to order this:
The cost was about $9 (including shipping.) Basically, you make your cake:
I prefer to spend hours baking from scratch. I don't know why these came out looking like chicken pot pies. I did not cut that slit in the top.

Then you frost the cake. I used this recipe. And I added a little almond extract. And I made it times 1.5. Never hurts to have extra frosting to fill in the gaps, slits, pits, missing layers, etc.

Then you peel the backing off of Yoshi and put him on your frosted cake and he kind of "melts in" to the insane amounts of butter in the frosting. It will probably also melt-in to my thighs.
I forgot to mention that you can have this personalized, but the bday boy wanted it to say "Happy Birthday Yoshi." He also wants me to call him "Yoshi" on his birthday. Go figure. I'm just thankful we outgrew the fishsticks.
Anway, then I put a little color in the remaining frosting, and piped around the edges for a more finished look.


And there you have it! Yoshi's birthday cake! And many more.....
Thursday, March 25, 2010

The M Effer of All Projects

This project did not involve paint, but it is definitely a project worth sharing! I have seen many a "Sell this House" episode in which metal sheeting was applied to an appliance, giving it an instant face lift and blast into the current century. I was hoping to do the same with this little number circa 1994:I hunted around and ordered some metal sheeting. I think the cost was around $90 a roll, which was pretty inexpensive versus the alternative. Obviously I was looking for a cheap update or I would've just saved myself the trouble and hauled myself up to Sears. Or maybe I was trying to save myself from the CREEPY people that work at Sears here in my small town. Here's the deal - have you ever tried to wallpaper and when you were almost finished, it dawns on you that you are out of paper. Me, being both a tight ass and a "gotta finish what you start" kind of gal, I never wished to order another roll. So I would find myself searching around on the ground for leftover pieces to patch up my remaining wall. This was neither fun nor visually appealing. So how does this relate to metal sheeting? Well, you don't get much for your $90. So you gotta be careful or your fancy new "stainless look" appliance will have a seam running down the middle of it. This is hint #1 to mastering this M Effer Project.
Next, if you decide to stick your oven in a time machine and transport it to the future, I would recommend you wear gloves. As I was trying to cut and measure, and figure out exactly how I was going to maneuver the handles and buttons on my oven and microwave, it dawned on me that this was not going to be as easy as it looks on HGTV. I tend to get tunnel vision, and I was so involved in my cutting and measuring and getting this the hell done so I can enjoy my awesome stainless look appliances, that I didn't realize that I my hands were bleeding from multiple wounds until I saw the blood dripping on my stainless sheeting. Lucky me, the sheeting is pretty washable. That was one positive thing I can say. Anyway, hint #2 is wear gloves when you get after this M Effer Project. Especially if you are squeamish.
Finally, I began to stick the sheeting on the appliances. It is very much like using Contact Paper. There was excessive bubbling. At one point, I even got a needle to begin popping the bubbles to release the air underneath. This technique did not enhance the stainless look. So hint #3 is find a way to not make bubbles in the first place. Sounds easy. But it's not. So good luck solving that issue on your own. If you do figure it out do NOT feel the need to share your hints with me.
Here is how the project is going at this point:
Not bad. See the little "window" in the oven? That wasn't easy. Well, throughout the project, I had growing frustrations, what with my increasing physical pain and the frustration of the seams and bubbles, not to mention my husband and his friend watching from the recliners in the living room (not helping) and laughing at me. I was several hours in at that point and I had to give up on the bubbles. My goal shifted. All I needed to do was trim the sheeting's edges really cleanly so that no one would cut themselves just walking by. So I was working on that, and I'm sure my knife was a little dull at that point. I just could not get it straight, and close enough that it wouldn't be dangerous. And I don't know what compelled me to do the next thing that I did..... most likely a lack of blood flow to the brain...I took my finger....and ran it down....the edge.....to see if it was sharp....and I proceeded to cut myself VERY DEEPLY. Drops of blood began to fall on my white tile and I screamed IT. Yes, I screamed it for my innocent children, my doting husband, my neurotic dog, and the poor friend my husband had invited into our loving home. I yelled, "MOTHER FU@#ER!!!!"

Here is what my oven/micro combo looks like after:
Isn't it pretty? I got it at Sears. From the Creepy Guy. And I just finished paying it off! And I also got a new countertop and backsplash. No blood transfusion required! (But the project cost a little more than I was anticipating.)
My final tip is very simple - just skip this mother and go to Sears.

Wednesday, March 17, 2010

Patio Painting

I have always wanted to paint my concrete patio but thought it would be too complicated. Well, it finally got so dirty out there, I was pushed into trying it. Well, that and the fact that there was a "Stain Your Concrete" display at Sherwin-Williams, where I frequent. So I picked up the pamphlet, read the directions carefully, and dropped about $100 on supplies.
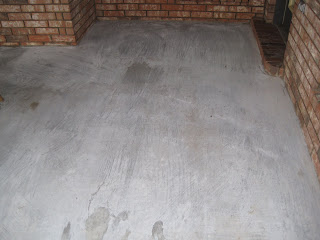
So here is the before...
Step One - Removal of Accumulated Porch Crap - We had a lot of junk on our patio. I put it all out in the yard. It was not a pretty sight. Then I swept and hosed off the patio.

Step Two - Etching. I bought a bottle of the etching solution, which is basically a strong acid. The directions say to pour it into a watering can and evenly pour it onto your patio. With all my stuff everywhere, I couldn't locate my watering can. Do I have a watering can? Anyway, I decided to dump the acid into my mop bucket, and pour it onto the patio. It immediately bubbled up and ate the top layer of concrete off my patio. You have to use a broom to scrub it in and rough it up until the bubbling stops. And go in small segments, and you are supposed to wear goggles. Which I didn't. But later, when I rinsed all the solution off, and some water ricocheted into my eyes, I wished I had just put on some sunglasses or something. "Is my eye burning? I think it's burning. Maybe not. Wait. I think it is." One more thing, the rinsing process took awhile, and I made sure and bought the type of etching solution that would not harm my yard. Which is funny, because my yard is mostly weeds and we have spent hours spraying Round Up on it.

Step Three - Wait 24 hours. I had to wait longer because it did something strange in West Texas - it rained. Yes, and all my stuff was out in the yard. The strong WTX wind blew everything dry anyway. Except for my rug, which I decided to trash because I pictured it marinating in the wet dog poopy yard. I just couldn't get over that.
So this is what my newly etched patio looked like. Etching solution is supposed to make it feel like sandpaper.
Step Four - Begin staining around the edges. I didn't tape it off. But you could if you like using the fun blue tape. The weather was another bummer. The entire time I was painting, the wind was blowing 90 mph, so I finally gave up. Blades of grass and sand were sticking to my paint stain.

Step Five - Roll it on! When the wind died down, I had to re-sweep the sand dunes off the porch. Then I could begin to paint. You just roll it on, going in the same direction. I used a basic hand-roller. When I was finished going that direction, I placed the roller inside it's original package, threw away my first paint tray lining, and waited for about 3 hours.

Then you roll on another coat, going perpendicular to your original direction. It began to get dark outside, and maybe it was the paint fumes, but several times I had to ask myself, "Wait, am I going in the right direction?" I hope that is normal.

Now all that's left to do is obsess about all the dust that is blowing on my new pretty patio! I think now that it is stained, the dirt won't become so "ground in" and I'll be able to get it cleaner.

Also, I need to buy a new rug.